In a recent project I have been working on voice VLAN implementation and 802.1x (or dot1x) authentication in our Cisco switching infrastructure. There was little to nothing on the subject to be found online, so I thought I would share my experiences.
The first part is very simple. Cisco primarily offers their own Discovery Protocol (CDP) to teach IP phones about specific voice VLAN assignments on the connected switch port. CDP is also used to discover that the device is PoE enabled and offer Power over Ethernet to it if the switch supports it. Lync Phone manufacturers rather use the industry standard Link Layer Discovery Protocol (LLDP) for this. Luckily, Cisco also has support for LLDP and only needs to be enabled on the switch:
# Global LLDP config

# This makes LLDP run on the switch, so that phones can learn the voice VLAN info from the switch

lldp run
The interface then needs to be told what VLAN to assign voice and data devices that connects:
# Interface related config

interface GigabitEthernet1/0/4

switchport mode access

# Default VLAN for data

switchport access vlan 108

# Default VLAN for voice

switchport voice vlan 114

end
Now you just need to reset the interface (shutdown / no shutdown) and the phone will pick up the new assigned VLAN. Make sure you have a DHCP server offering address and options in that VLAN. Any PC attached to the phone will be put in the data VLAN we defined. This is useful both for address management (separate subnets) as well as security – where you isolate the devices to avoid packet sniffing, eavesdropping etc.
Let’s move on to dot1x authentication, which is slightly more complex to implement. The first issue we face is that Lync Phones do not support dot1x. They will relay dot1x requests to connected PC’s but cannot authenticate themselves.
One workaround is to have the PC authenticate both devices, but then you cannot use the phone without the PC. This way both phone and PC are put in the same VLAN when authenticated (also known as multi-host mode).
This is of course no good to us now that we have learned how to separate the phone and PC in different VLAN’s. In order to setup authentication for Lync phones we will have to use another authentication method called MAC Authentication Bypass, or MAB. This is simply explained a method where the phone can authenticate by it’s MAC address. I will be using a Windows Server with Network Access and Policy Server (NPS) service, as it requires no extra license and is included with the Windows server – you only need to install the role on the server (not covered here).
To have devices authenticate we need to define AD users for them by their MAC addresses:
User name: MAC address, all lower case letters.
Password: MAC address, all lower case letters.
Create a Security Group and add the devices to this. As an extra security concern, remove any other security group membership, like the default Domain Users:
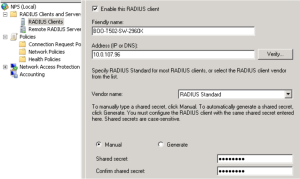
Next we need to set up the RADIUS server, where the devices ultimately will be accepted or rejected for network access. Under Server Manager and NPS management, do the following:
Under RADIUS clients, enter the IP address of the authenticator switch. Shared secret must match the key entered in the RADIUS server definition on the switch.
Next up is Connection Request Policy. This is more of a general policy. The Network Policy defined afterwards will be more fine grained as to what conditions are required FROM the clients and any settings to send back TO the clients.
Overview: Enter a policy name and leave the rest to default.
Conditions: Here I have used a regex pattern that will match any switch management IP. Regex pattern is ^10\.0\.107\..+$ which will basically cover all IP addresses in the 10.0.107.0 subnet – which all of my switches belong to.
Settings: Make sure that we leave the authentication specifics to the Network Policy, so do not override.
Under Network Policies, make sure we define two policies – one for MAB and one for dot1x – and place them above any “Deny Access” policies in the policy order.
First off, the MAB policy. Under overview: Enter a policy name and leave default.
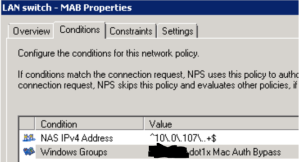
Conditions: This policy will apply to all clients being authenticated from a LAN switch (regex IP syntax) and only users/devices that belong to the AD group for dot1x Mac Auth Bypass
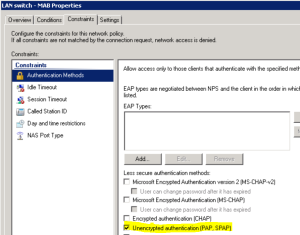
Constraints: Only PAP unencrypted authentication will work with MAB.
Settings: What is sent back to the device. Choose “Vendor Specific” attributes, “Cisco” as the vendor and enter the value “device-traffic-class=voice”. This makes the device use the voice VLAN specified for the switchport.
If you like you can override and rather send the VLAN assignment (instead of relying on the switch interface setting) using “Standard RADIUS” attributes, like this:
Next is the dot1x policy.
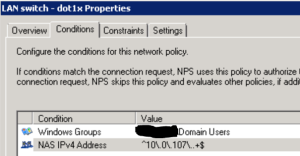
Conditions: This will apply to all clients that belong to AD user group Domain Users and that are authenticating from a switch in my network (based on regex for the IP address).
Constraints: Choose PEAP for authentication method. Clear all other methods.
Settings: Leave blank to have the client use the default data VLAN defined on the switchport, or use the attributes mentioned above (Standard RADIUS attributes) to send a specific VLAN to the device.
Now we need to head to the switch to set up things.
# Global dot1X config:

# Enable security features like dot1x and RADIUS authentication

aaa new-model

# Enable dot1x

dot1x system-auth-control

# Local accounts to be used for switch login

aaa authentication login default local

# RADIUS server group to be used for dot1x authentication

aaa authentication dot1x default group radius

# Authorize locally authenticated users for exec mode

aaa authorization exec default local if-authenticated

# Authorize RADIUS server to send network related instructions to the switch (VLAN etc)

aaa authorization network default group radius

# RADIUS server group setup

radius server NPSSERVER

# IP address and ports used for authentication and accounting

address ipv4 10.0.100.100 auth-port 1812 acct-port 1813

# Shared secret with RADIUS server

key yoursharedsecret
NOTE: RADIUS server configuration on IOS version previous to 15.2(3) will probably need to look like this:
radius-server host 10.0.100.100 auth-port 1812 acct-port 1813 key yoursharedsecret
Configure the interface that will use dot1x authentication with MAB:
# Interface related config

interface GigabitEthernet1/0/4

# Default VLAN for data

switchport access vlan 108

# dot1x is only supported on access ports, not trunks etc

switchport mode access

# Default VLAN for voice

switchport voice vlan 114

# How many devices are allowed on the switch port – Phone + PC

switchport port-security maximum 2

# Make sure both phone and PC will need to authenticate

authentication host-mode multi-auth

# Use MAB before dot1x – avoid having to wait for dot1x timeout before phone can authenticate

authentication order mab dot1x

authentication priority mab dot1x

# Activate 802.1x authentication on the port

authentication port-control auto

# Activate MAC Authentication Bypass (MAB)

mab

# Tell the switch port to be an authenticator (relay requests to RADIUS) and not a supplicant

dot1x pae authenticator

# Avoid having to wait for STP timeout before port is active

spanning-tree portfast

end
The picture shows both phone and PC as authenticated and belonging in voice and data domains respectively:

Another one showing that the VLAN assignments are correct:


Well written! I too found the documentation in this area lacking. Thanks for sharing with the community.
Very nice job I have got some questions. is there any configuration for server/scope options on DHCP Server? if yes please clarify us thanks
Yes, there are some options that need to be provided by DHCP server. Others have blogged about this, one I often look to is Jeff Schertz’ blog post: http://blog.schertz.name/2010/12/configuring-lync-server-for-phone-edition-devices/
Ok Do I have to set need to also configure the DHCP option for VLANs (VLANID)? http://blog.schertz.name/2011/01/manual-vlan-configuration-for-lync-phone-edition/
VLAN only need to be provided on the switch interface, once authenticated the device will already be in the correct VLAN and DHCP only need to provide IP address, DNS and Lync server specific options.
thanks mate